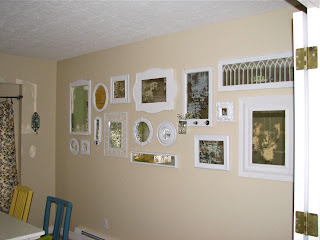
In my blog-stalking, I found THIS . . . a tutorial for this awesome technique of removing some of the reflective coating off of mirrors to give them an old-antique-y look . . . I LOVE this girl - she's Ah-mazing!!! If I forget my list of "ooooh I wanna do that's" - I just have to go through her posts and there my list appears! Another thing I LOVE about her is that she lives in St. George, Utah - a soft place in my heart - because I went to Jr. High there . . . and my parents have returned to live there!!!
SO . . . after seeing her post on "the acid technique" as I'll call it hertoforeafter . . . (my vocabulary and grammar get REALLY bad when I'm excited!!) PLUS her post on a mirror wall . . . I knew I wanted to have them both . . . together!!!
So - step 1 . . . find mirrors and/or frames . . . thrift stores ✓, yard sales ✓, clearance rack at Michael's ✓search all closets ✓, a couple generous friends ✓ . . . and I got a whole slew of 'em!
Step 2 . . . Unification . . . I wanted the frames all white, but not exactly the same white . . . so I used a couple different white spray paints - and this one -
Had such awesome detail that I sanded it up a bit after painting. One of them was already a good distressed white as well.
Step 3 . . . Mirrors. A few of my frames needed mirrors to start with - so I went to a local glass shop and got some custom cut . . . I wasn't thrilled with how much they ended up costing - but to be honest - I loved this project so much I got over it.
Step 4 . . . Prep mirrors. So - I got pretty nervous about the fact that I was going to be playing with acid - but after the first round, I stopped shaking. Here's my advice on this acid technique - ✻ MAKE SURE you follow the instructions in the link above!!!!! My gloves probably (OK I'm sure they) weren't the right kind . . . they need to withstand the acid. When you start to feel an itchy cold sensation in your fingers - you know you shoulda got some serious chemical gloves.
✻ DO NOT breath in the air after you spray the acid . . . not pleasant!
✻ If you aren't getting the reflective coating off as easily, use a Mr. Clean magic eraser - but remember, if the acid sits too long - it will ALL end up coming off . . . the magic eraser is just a good catalyst that won't scratch the glass.
Step 5 . . . placement - DO NOT SKIP THIS STEP! I've done it many times - and always regretted it! Make a paper copy of each and every frame - trace them so you have all their correct shapes. Use the paper copies to find the placement you like - I first placed the papers on the floor to get the right positions then put them up on the wall with end, top & bottom measurements more accurate.
Step 6 . . . Fabric & Paper - at this point - my marking papers are taped up where I want them and I put the frames on the floor in the identical pattern - and start adding the fabric & paper to the frames. I pulled out PILES of my scrapbook paper and used the paper on all the frames small enough - then hit the fabric for the larger frames. I did this to balance out the colors and pattern sizes of the paper & fabric in the frames - otherwise, you could end up with a cluster of green mirrors (and who wants that?)
Step 7 . . . Hanging - I replaced the marking paper one by one - and was able to do slight adjustments if necessary.
THIS magnetic frame from a yard sale:
TURNED INTO THIS:
This was SO much fun and I'm so excited how it turned out . . . If anyone needs some muriatic acid - let me know!!!


No comments:
Post a Comment